Setup for a ham radio vertical dipole of 5.6 meter fishing rod length that works multi-band 40 to 10 meters with inductive loading. No need for radials because of K9YC style ferrite chokes. Design suits restricted space balcony or portable operation.
As a regular K9YC vertical, the system covers the 17 to 10 meter bands using a transceiver-side antenna tuner. However, the proposed asymmetric loading technique achieves far superior performance on the 17 and 15 meter bands. It moreover enables operation on the 20, 30 and 40 meter bands within the 5.6 meter size limit. Just by placing load coils off-center the design results in good SWR matches below 1.5.
Due to its lightweight construction, all it takes to support the vertical antenna is a telescoping fishing rod. An additional telescoping tower made of aluminum or steel lifts up the heavier ferrite chokes and lower end of the dipole.
I recommend reading this post on the purpose and construction of the ferrite RF chokes as an introduction.
SWR Matching of Vertical Dipoles Shortened by Inductive Load
It is well known to the ham radio community that shortening wire antennas by inductive loading reduces the feed impedance. For instance, the ARRL Antenna Book[1] has impedance tables for top and base loading of verticals, according to which the center feed impedance of a dipole shortened by factor four drops to below 5 Ω. To counteract this effect, moving away from the center increases the resistance of the feed point. Therefore, a combination of shortening by inductive loading and shifting the feed point adjusts the feed resistance to a wide range of target values, such as the 50 Ω commonly in use by ham radio transceivers.
For a better understanding of asymmetric designs I recommend checking out off-center-fed dipoles[2] like the Windom[3] antenna.
Because of the design of vertical dipoles with high impedance ferrite chokes, matching antennas by off-center feeds is especially unproblematic. Unlike the Windom[3] antenna, asymmetric vertical dipoles do not produce a heavy load of shield currents.
Shortened Vertical Dipole Wiring Scheme
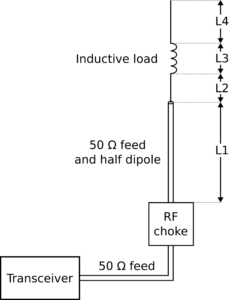
Figure 1 shows the wiring scheme for the shortened dipole with RF choke, feeds and inductive load. Labels L1 through L4 identify the antenna sections for which dimensions are given in the next section. As explained in my post on K9YC Verticals, the RF choke serves to electrically separate the dipole from its feed.
Vertical Dipole Antenna Wires with Loads and Dimensions
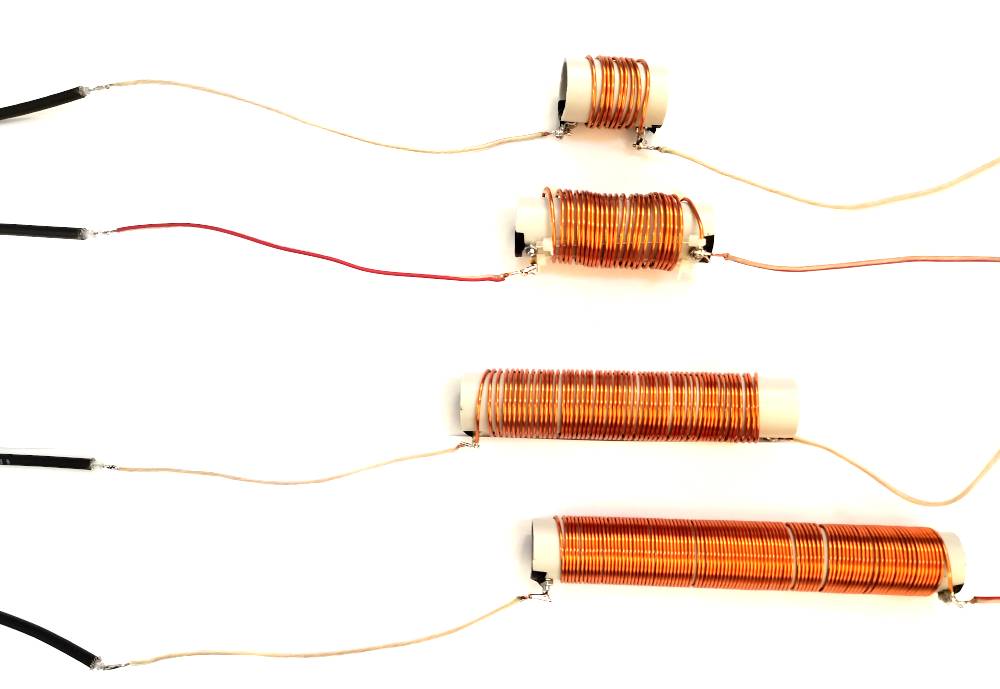
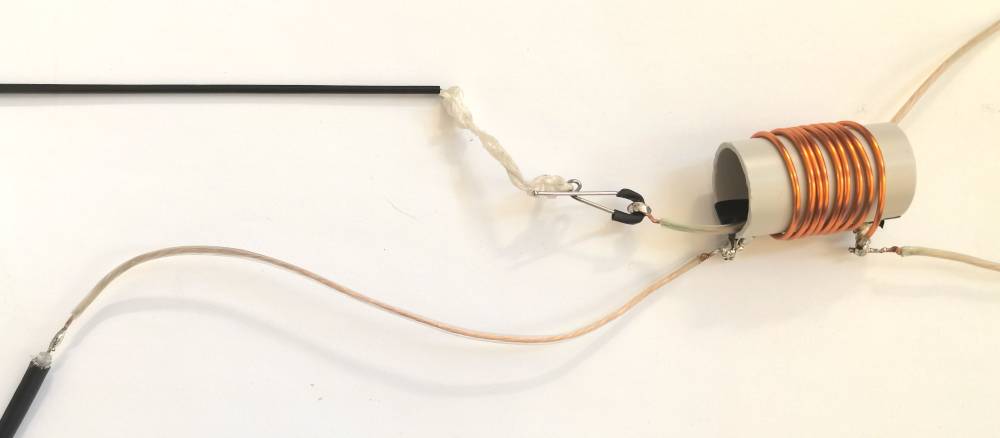
Figure 2 depicts load coils for 40, 30, 20 and 15 meter ham radio bands. All coils are fixed on the same kind of tubing for electrical installations available at hardware stores. The tubes are 2.54 cm (1 inch) in diameter and the enameled copper wires have thicknesses of 1.5 and 1.2 mm. Coils for 40, 30, 20, and 15 meters have 97, 55, 25, and 9 turns, respectively. In addition to the coils, the image also shows the RG 58 feed lines with just the inner conductor connecting to the L2 wire sections.
Since all the L1 feed sections are about the same length, it’s surprising that the L2 sections don’t vary much either. This is very likely not optimal and when I find the time, I may experiment some more.
Nevertheless, despite the similar wire lengths, in all of the configurations the feed point moves away from the center electrically. This is due to the growing portion of the full-sized dipoles that the inductive loads replace. As a result, the center point of the dipoles moves inside the inductive loads. This effect, in turn, electrically pushes the feed point towards the lower side of the antenna. So as the center impedance decreases with larger coils, the cancellation effect of the off-center feed point increases. At least, that’s my theory.
Having verified that my full-size vertical dipoles worked well, I actually expected to need impedance transformers on top of the load coils. But as is, the system performs much better on lower bands than I had hoped for. All the same, I think it might be worthwhile to optimize my dipoles with some modeling software.
Wire Lengths
| Band | L1 | L2 | L3 | L4 |
|---|---|---|---|---|
| 10/11m | 2.37 | n/a | n/a | 2.41 |
| 12m | 2.725 | n/a | n/a | 2.74 |
| 15m | 2.60 | 0.21 | 0.035 | 2.505 |
| 20m | 2.61 | 0.19 | 0.07 | 2.47 |
| 30m | 2.63 | 0.17 | 0.125 | 2.42 |
| 40m | 2.62 | 0.19 | 0.16 | 2.365 |
Table 1 has the wire lengths for my configurations for 10 to 40 meters. The L1 numbers include the 12 cm from SO 259 plug of the wires to the first ferrite choke. Between 26.985 and 28.074 MHz I get an SWR of 1.6 or below. For 12 meters I used a low loss feed cable so I can match the wire between 18 and 30 MHz with an antenna tuner. However, on 21 MHz tuning losses are already quite significant. Setups with load coils for 15 to 40 meters are likely not optimized, but way better than the alternative of using a match-box. As mentioned before, it might still pay off to verify dimensions in a modeling software.
Mounting and Changing Dipole Wires
One obvious downside of the verticals is the need to swap wires in order to change bands. But with some practice, the process is now relatively swift for me.
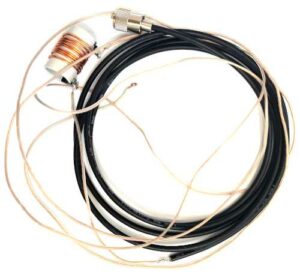
A simple knack to get wire on and then the coil over the rod is to first pass the end of the wire through the coil like in Figure 4. Then slide the coil over the black tip of the rod on the left hand side to get the end of the wire on the right hand side of the coil. Afterwards, with the rod pointing up vertically, push up the rod starting with the thinnest innermost segment. In the process it’s advisable to rotate segments to get the wire wrapped around the rod.
Also note the paper clip that I keep attached to the top of the rod with the white cord. It’s very convenient because the little ring that secures the wire quickly slides over. Keeping the clip tied at all times has the huge added benefit of not having to go fishing for the tip of the rod. Hold up the rod vertically and try to get out its smallest segment to see what I mean.
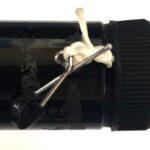
When flipping wires I always keep the fishing rod’s rubber cap at hand. Not only does it protect the outer segment from damage, it’s also perfect to firmly hold the paper clip when attaching wires.
Tower and Rod in Operation
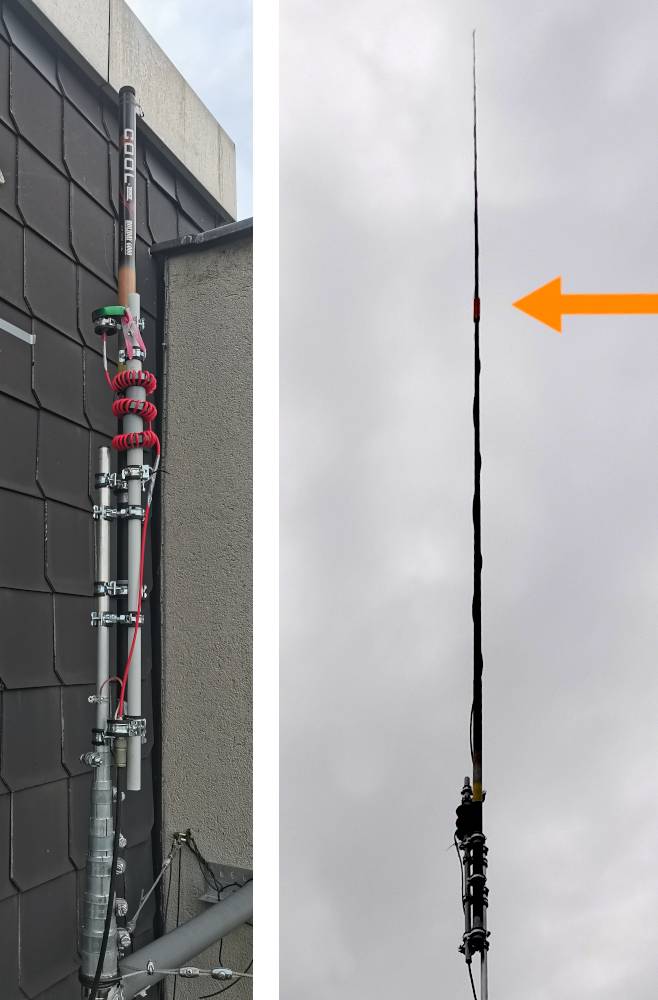
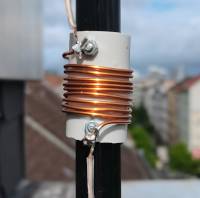
Finally, my telescoping tower on the left and extended rod on the right side of Figure 6. I step on a ladder to clip in wires with RF choke and rod mounted on the collapsed tower. Note how the coil for the 40 meter band, pointed to by the orange arrow, hardly adds to the wind load of the rod. Similar for the ferrite chokes with a much smaller wind surface than an equivalent T2LT coil for 40 meters.
References
[1] Vertical Antennas, ARRL Antenna Book, 24th edition, Chapter 9.2
[2] Off-center-fed Dipoles, Hamradiosecrets.com
[3] Windom Antenna, W8JI